
Version 1.0.0
Do you dream of the perfect contoured look, but find yourself short on time? Contouring does not need to be a long, tricky process! Just knowing some techniques and a few hacks you will get a flawless finish in no time and ace the look.
We’re confident that these 7 time saving contouring tips will have you sculpting, defining, and glowing to your heart’s content all without spending hours in front of the mirror. If you’re a busy bee or just want to make life a little easier when doing your makeup, these tips can help you get a flattering look in a flash. Let’s dive in!
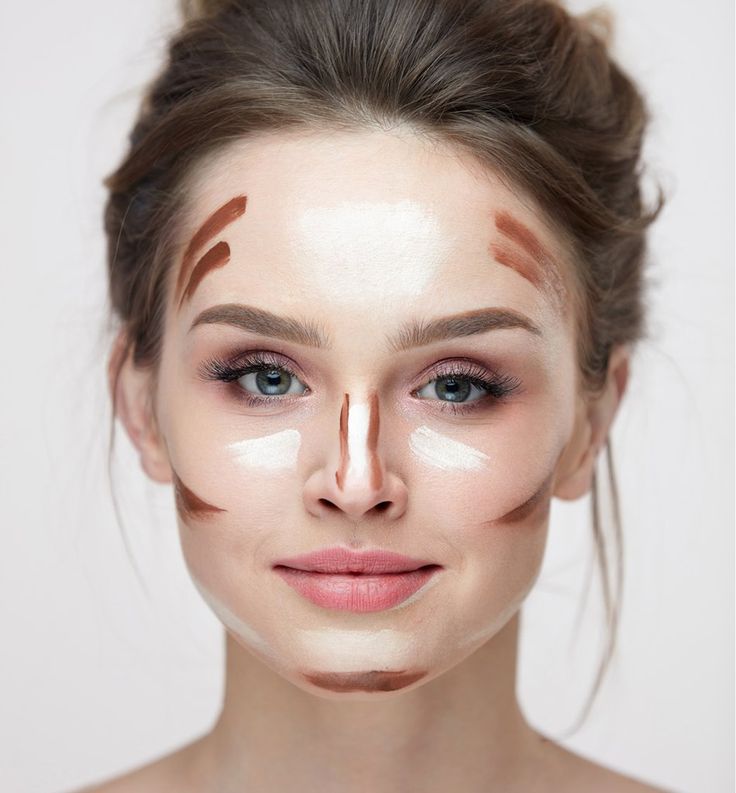
Photo: Pinterest
Quick Contour Basics
Contouring can seem difficult, but it doesn’t have to be. Learning quick contour basics can save you a lot of time. This guide will help you understand essential tools and color theory. By the end, you’ll be able to contour with ease and speed.
Essential Tools
Having the right tools is crucial for effective contouring. Here are the essential tools you need:
- Contour Brush: A good contour brush makes all the difference. It should be angled and soft.
- Blending Sponge: Use a blending sponge to smooth out the lines. This makes your contour look natural.
- Contour Palette: A palette with different shades is best. It allows you to mix and match colors.
- Highlighter: A highlighter adds a glow to your face. Use it on the high points of your face.
These tools help you create sharp lines and soft blends. Investing in good quality tools ensures your contour looks professional.
Color Theory
Understanding color theory is key to good contouring. Different shades can change how your face looks. Here are some basic rules:
- Dark Colors: Use dark colors to create shadows. This makes areas look smaller.
- Light Colors: Use light colors to highlight areas. This makes them stand out.
Choosing the right shades depends on your skin tone. Here’s a simple guide:
| Skin Tone | Contour Shade | Highlight Shade |
|---|---|---|
| Fair | Light Brown | Ivory |
| Medium | Medium Brown | Beige |
| Dark | Deep Brown | Golden |
Matching your shades to your skin tone makes your contour look natural. Experiment with different shades to find what works best for you.

Prep Your Canvas
Contouring can transform your look. It can enhance your natural features. But it often takes too much time. These time-saving contouring tips can help. With the right preparation, you can contour quickly and effectively. The first step is to prep your canvas. This means preparing your skin. Follow these steps to achieve a flawless look.
Skin Care Steps
Beautiful makeup starts with healthy skin. Proper skin care is crucial. Here are some essential steps:
- Cleanse: Always start with a clean face. Use a gentle cleanser. This removes dirt and oil.
- Exfoliate: Exfoliate once a week. This removes dead skin cells. It helps makeup go on smoothly.
- Moisturize: Use a good moisturizer. It keeps your skin hydrated. This helps makeup last longer.
Good skin care ensures a smooth base. This makes contouring easier and faster. By following these steps, you set the stage for flawless makeup.
Read More: 9 Effective Glitter Makeup Tips To Sparkle Up Your Look
Primer Importance
Primer is a must for a flawless look. It prepares your skin for makeup. Here’s why primer is important:
- Smooths Skin: Primer fills in fine lines. It creates a smooth surface. This makes makeup application easier.
- Long-Lasting: Primer helps makeup last longer. It prevents makeup from sliding off.
- Minimizes Pores: Primer reduces the appearance of pores. This gives your skin a flawless look.
Using primer saves you time. It ensures your makeup looks good all day. Apply a small amount after moisturizing. This simple step can make a big difference.
How To Choose The Right Products For Contouring
Contouring can transform your makeup game. With the right products, it becomes easy and quick. The secret lies in choosing the best tools and cosmetics for your needs. This guide will help you select the right items to save time and get flawless results.
Cream Vs. Powder
Choosing between cream and powder contouring products can be tricky. Each has its own benefits and drawbacks. Creams are great for a more natural look. They blend seamlessly into the skin. Powders, on the other hand, offer a more dramatic finish.
Here are some pros and cons to consider:
| Cream Contour | Powder Contour |
|---|---|
| Blends easily | Lasts longer |
| Hydrating for dry skin | Great for oily skin |
| Can look more natural | Provides a matte finish |
| Requires more time to apply | Faster to apply |
Cream contour works well if you have more time to blend. It is perfect for dry skin. Powder contour is a better choice for quick application. It suits oily skin types better. Choose based on your skin type and the time you have.
Multi-use Products
Multi-use products are a game-changer for saving time. These products can serve multiple purposes. They reduce the need for carrying many items. One product can act as a contour, blush, and even a highlighter.
Here are some examples:
- Stick foundations can be used for contouring and foundation.
- Lip and cheek tints work for both lips and cheeks.
- Eyeshadow palettes can also be used for contouring and highlighting.
Using multi-use products can streamline your makeup routine. You spend less time searching for different items. These products also help in reducing the clutter in your makeup bag. Make sure to pick shades that suit your skin tone for all purposes. 
Fast Application Techniques
Contouring can enhance your features but often takes a lot of time. Fast application techniques can help you get the perfect look without spending hours in front of the mirror. Here are some time-saving tips to contour like a pro.
Brush Vs. Sponge
Choosing between a brush and a sponge can be confusing. Each has its pros and cons. Brushes are great for precise application. They allow you to control the amount of product. This helps you build up the intensity slowly. Sponges offer a blended, natural look. They are perfect for quick application. Let’s look at a comparison:
| Brush | Sponge |
|---|---|
| Precise application | Blended look |
| Control amount of product | Quick to use |
| Perfect for building intensity | Natural finish |
Both tools can be effective. It depends on your needs and the look you want. Brushes work well for detailed contouring. Sponges excel at speed and blending. Try both to see which fits your routine best.
Fingers For Speed
Using your fingers can be the fastest way to contour. They are always available and need no cleaning. Fingers warm the product, making it easier to blend. Here are some steps to contour using your fingers:
- Start with a small amount of product.
- Apply it to the hollows of your cheeks.
- Blend it out with circular motions.
- Use your ring finger for the nose contour.
- Blend upwards towards the temples.
Fingers can be very effective for a quick touch-up. They allow you to feel the contours of your face. This ensures a more natural application. Remember to wash your hands before and after. This keeps your skin clean and prevents breakouts.

Mapping Your Face
Contouring can make your face look amazing. But it can also take a lot of time. Here are some tips to help you contour quickly and easily. Learn how to map your face for the best results.
Key Areas To Contour
Contouring highlights and defines your face. You need to know the key areas to contour. These areas are the forehead, nose, cheeks, and jawline.
Forehead: Apply contour along your hairline. Blend it well for a natural look.
Nose: Draw two lines on the sides of your nose. Blend them in to make your nose look slimmer.
Cheeks: Find the hollows of your cheeks. Apply contour there to make your cheekbones stand out.
Jawline: Apply contour along your jawline. This can make your face look more defined.
Quick Reference Guide
Here is a quick reference guide for contouring:
| Area | Action |
|---|---|
| Forehead | Apply contour along the hairline |
| Nose | Draw lines on sides, blend |
| Cheeks | Find hollows, apply contour |
| Jawline | Apply contour along the jawline |
Always use a brush or sponge to blend the contour. Blending is key for a natural look. Practice makes perfect. Keep practicing these steps to get faster and better.
Blending Hacks For Contouring
Discovering time-saving contouring tips can transform your makeup routine. Blending hacks play a vital role in achieving a flawless look quickly. With the right methods, you can contour like a pro without spending hours in front of the mirror.
Layering Techniques
Layering techniques are essential for a quick contour. Start with a light foundation. This creates a smooth base for the rest of your makeup. Next, use a cream contour. Creams blend faster than powders. Apply the contour under your cheekbones, jawline, and sides of your nose. Blend with a damp makeup sponge. This ensures a seamless finish.
After blending the cream contour, set it with translucent powder. This step prevents the makeup from creasing. For added definition, use a powder contour over the cream. The powder adds depth and dimension. Blend again to avoid harsh lines.
- Start with a light foundation.
- Apply cream contour on key areas.
- Blend with a damp sponge.
- Set with translucent powder.
- Finish with powder contour for depth.
Using these layering techniques saves time and ensures a long-lasting contour. Remember, blending is key to a natural look.
Also Read: Secret Tricks To Eyeshadow Makeup For Perfect Look
Using Setting Spray
Setting spray is a game-changer for quick contouring. After completing your makeup, hold the setting spray 8-10 inches away from your face. Spray in an ‘X’ and ‘T’ shape. This covers all areas evenly. Setting spray helps lock in your makeup. It ensures your contour stays put all day.
Using a setting spray can also help blend your makeup further. Some sprays have a dewy finish. This can enhance the glow of your contour. For oily skin, choose a matte setting spray. This helps control shine and keeps your makeup in place longer.
| Skin Type | Recommended Setting Spray |
|---|---|
| Dry | Dewy Finish Spray |
| Oily | Matte Finish Spray |
| Combination | Long-Lasting Spray |
Incorporating a setting spray into your routine is a simple step. It makes a big difference in the longevity and appearance of your contour. Choose the right spray for your skin type to achieve the best results.

Finishing Touches
Contouring can seem time-consuming, but it doesn’t have to be. With the right techniques, you can achieve a flawless look quickly. These tips will help you save time while ensuring your contouring game is on point. Let’s dive into the finishing touches that make all the difference.
Highlighting Tricks
Highlighting is a key step in contouring. It can make your features pop and give you a radiant glow. Here are some quick tricks to get it right:
- Use a cream highlighter for a quick application.
- Apply highlighter on the high points of your face.
- Blend with a damp beauty sponge for a natural finish.
For an even faster application, use a highlighter stick. Draw it directly on the areas you want to highlight and blend. This method saves you time and gives you precision. Remember to highlight the inner corners of your eyes and under your brow bone. These small touches can make your eyes look bigger and more awake.
Setting Your Look
Setting your contour is crucial for long-lasting wear. A setting powder or spray can lock in your look and keep it fresh all day. Here’s how to do it quickly:
- Use a translucent setting powder for a matte finish.
- Apply powder with a fluffy brush to avoid cakiness.
- For a dewy finish, opt for a setting spray.
Lightly dust the powder over the contoured areas. This will help to set the makeup without making it look heavy. If you prefer a glowing look, mist your face with a hydrating setting spray. This will not only set your makeup but also give your skin a healthy glow.

Common Mistakes
Contouring can be a game-changer for enhancing facial features. But many people make common mistakes that waste time. Learning these time-saving contouring tips can make a big difference. It will help you achieve a flawless look quickly. Let’s explore some common mistakes and how to avoid them.
Avoiding Harsh Lines
Creating harsh lines is a common contouring mistake. This can make your face look unnatural. Here are some tips to avoid this:
- Blend well: Always use a blending brush or sponge.
- Use less product: Start with a small amount and build up if needed.
- Choose the right shade: Use a shade that is just two shades darker than your skin tone.
Blending is key. Spend a few extra seconds blending your contour. This ensures a natural look. Also, avoid using too much product. Too much product can make lines look harsh. Choose a shade that matches your skin tone well. A shade too dark can make lines look harsh.
Too Much Product
Using too much product can make your contour look cakey. This can waste your time and product. Here are some tips to avoid this:
- Use a light hand: Apply the product lightly.
- Layer slowly: Add more product in layers if needed.
- Check your look: Use natural light to check your makeup.
A light hand is important. Apply the product lightly. Then, add more if needed. Layering slowly helps you control the amount of product. Checking your makeup in natural light can also help. This way, you can see if you need more product or not. These tips can save you time and make your contour look great.
Time-saving Routine
Contouring can transform your face by highlighting your best features. But not everyone has time for a long routine. Time-saving contouring tips can help you look great in minutes. This routine is perfect for busy mornings or quick touch-ups. Let’s explore some tricks to speed up your contouring process.
Day Vs. Night Looks
Contouring for the day and night can be different. Daytime contouring should be light and natural. Use a light bronzer and a subtle highlighter. Nighttime contouring can be more dramatic. Use a darker bronzer and a more intense highlighter.
Here are the key differences:
- Daytime: Soft and natural look
- Nighttime: Bold and dramatic look
For the daytime, stick to neutral shades. Apply a small amount of product. Blend well to avoid harsh lines. At night, you can use bolder shades. Apply a bit more product. Blend well but leave a bit more definition.
Streamlined Steps
To save time, follow these simple steps:
- Start with a clean and moisturized face.
- Apply your foundation and concealer as usual.
- Use a contouring stick for quick application.
- Draw lines under your cheekbones, jawline, and sides of your nose.
- Blend the lines using a beauty blender or brush.
- Apply highlighter on your cheekbones, nose bridge, and brow bones.
- Blend the highlighter for a seamless look.
With these steps, you can contour your face in less than five minutes. Use multi-purpose products to save even more time. For example, some sticks have both contour and highlight ends. This way, you only need one product for both steps. 
Frequently Asked Questions
What Is The Best Contouring Technique For Beginners?
For beginners, a simple contouring technique is ideal. Use a matte bronzer and a highlighter. Apply the bronzer to your cheekbones, jawline, and temples. Highlight the tops of your cheekbones, bridge of the nose, and cupid’s bow.
How Do I Choose The Right Contour Shade?
Choose a contour shade that is two shades darker than your skin tone. For a natural look, opt for cool-toned bronzers. Avoid using too warm or too dark shades, as they can look unnatural.
Can Contouring Save Time In My Makeup Routine?
Yes, contouring can save time with practice. Use a contour stick or a palette. Focus on key areas: cheekbones, jawline, and forehead. Blend well for a natural look.
How To Contour For A Natural Look?
For a natural look, use light contouring products. Apply with a light hand. Blend thoroughly to avoid harsh lines. Focus on subtle enhancement of your natural features.
Conclusion
Mastering these time-saving contouring tips can enhance your makeup routine. You’ll achieve a polished look in minutes. Practice makes perfect, so keep experimenting. Soon, you’ll contour like a pro effortlessly. Share your newfound skills with friends and enjoy the compliments.
Happy contouring!